
Large Bevels With a Shopmade Router Jig

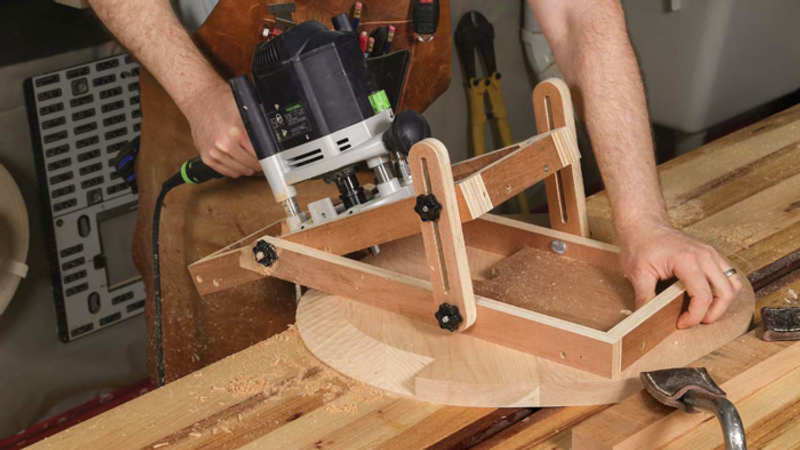
Recently I was commissioned to build a round kitchen table with a substantial underbevel. This brought up a few challenges. Since the table was too cumbersome to lift onto a saw, I needed to bring the tool to the material; my plunge router seemed like the perfect option. Since the bevel was over 45° and larger than any commercial bit could cut, and because I wanted some flexibility for future projects, I decided to make a jig that could be adjusted to different angles.

The jig I built, which consists of a base and a sled, is similar to ones used for flattening slabs, with a couple of additional features. The adjustable arms connecting the sled to the base allow you to cut different angles with the same jig. And the two shoulder bolts in threaded inserts at the bottom of the jig act as an edge guide to keep the bevel consistent around the curve.

Build the jig around the router
To make all the parts, you only need half a sheet of good-quality 3/4-in. plywood and a small amount of hardware that’s widely available at home centers. I start by ripping all frame parts to size, being sure to reserve enough material for the baseplate and router-sled base. After I rip long strips for my frames, I crosscut them to size with a chopsaw. To determine the interior width of the router sled, I use the width of the router base plus 1/32 in. for some play. These dimensions are specific for the Festool 1400 router but can be adjusted to fit any plunge router. The base assembly width is dictated by the outside width of the sled.


Clearance is key
After I cut everything to size, I label all my parts so I don’t get them mixed up. Since the sides of the sled guide the router, the heads of the T-bolts need to be inset. I cut a shallow dado for each one. With a dado stack in the saw, I make two dadoes on the inside face of each sled side. I then take them over to the drill press and drill a 1/4-in. hole in the center of the dadoes for the T-bolt to pass through.
I add blocks to the front end of the sled sides using cyanoacrylate glue to hold them in place. When the jig is assembled, the blocks will act as spacers, keeping the adjustable arms in plane. I continue the 1/4-in. holes for the T-bolts from the sled sides through the blocks.

Again at the drill press, I drill holes for the threaded inserts on the base where the indexing pins will go (which is easier to do now than after assembly). I drill these 3/8-in. holes with a brad-point bit. I put a dab of cyanoacrylate glue in the holes to make sure the inserts stay snug, and with a final tightening of the Allen wrench, it’s time to build the sled and base.

-Billy Hoysgaard is a furniture maker in Ipswich, Massachusetts.
| From Fine Woodworking #324
To view the entire article, please click the View PDF button below. |
 |
Sign up for eletters today and get the latest techniques and how-to from Fine Woodworking, plus special offers.
Download FREE PDF
when you enter your email address below.
View PDF


