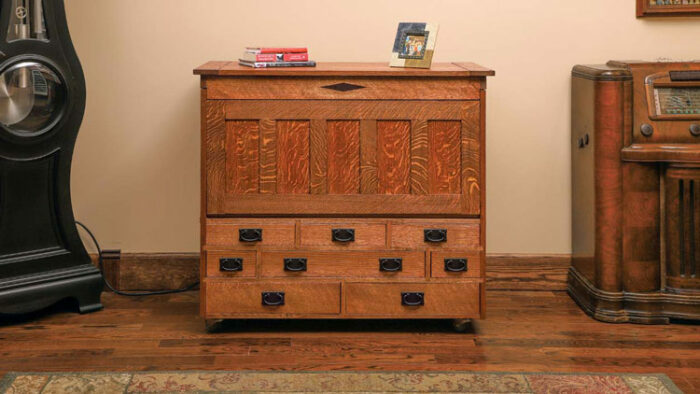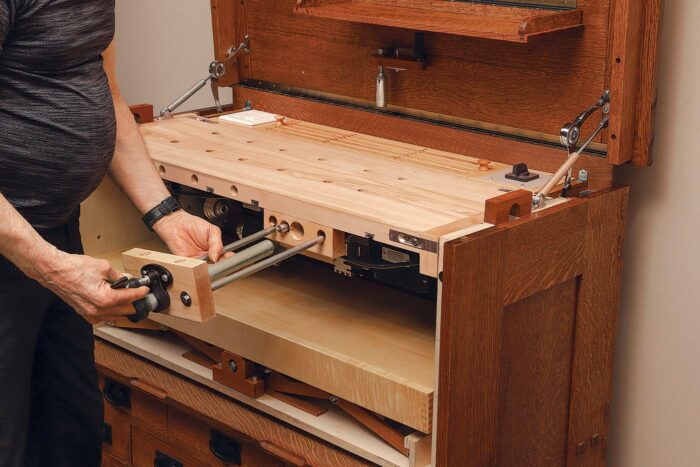
When I conceived of this project, I was thinking about people with an urge to make things but no workshop to make them in. We would all like a full-size workbench, but for those of us living in an apartment or condo, that is sometimes not feasible. So I designed a cabinet that, when closed, can stand in a living room or bedroom with the appearance of fine furniture. Once opened, however, it offers a workbench with vises, hold-downs, and air filtration; drawers with ample storage for tools and hardware; a desk for writing or drawing; and even a small lathe. I wasn’t thinking of the piece as suited for full-scale furniture projects (though who knows?) but rather for smaller-scale crafts such as chip carving, inlay, pyrography, jewelry making, or model making, and for modest turning projects.
 |
 |
The pivotal point
The major technical challenges of the project stemmed from my decision to include both a workbench and a lathe. I decided the way to do it was to mount the lathe to the underside of the workbench surface and make the slab pivot so either side could face up. How could I build this unwieldy hybrid work platform so it would rotate smoothly and effortlessly and lock in place securely? And how would I elevate the desk below, which would need to lift the lathe into position and then drop down again once the lathe was locked in place? As a longtime mechanical-design draftsman, I found the mechanics of the thing intriguing, and I chose to design and build from scratch all the mechanisms required for rotating the work surface and lifting and lowering the desk.
 |
 |
The cabinet’s frame-and-panel outer case is constructed from 1-in.-thick quartersawn white oak and joined with wedged through-tenons and dovetails. The desk, lifting mechanism, and rotating maple bench slab are all housed in an inner case made with 3/4-in.-thick Baltic-birch plywood and installed in the solid-wood outer case as an independent module.
The lifting mechanism

I built the lifting mechanism from jatoba, also known as Brazilian cherry, which I chose for its interlocking grain, density, and hardness. The lifting is initiated by a spreader jack, which engages a pair of dual scissor lifts, and the lifts contact the underside of a platen that moves the desk up and down. With the bench slab turned lathe side up, the desk is raised to contact the slab from below and elevate the lathe into its operating position. The bench slab then gets locked tight with four sliding pins, and the desk can be lowered.

The spreader jack is activated by a crank handle that drives an Acme-threaded screw. I sourced that screw—a double-threaded shaft—from a kit for building a Dubuque hand-screw clamp; it works incredibly well for the spreader jack, as its right- and left-hand threads prevent the shaft from projecting beyond the cabinet. A sliding guide and socket retainer hold the spreader jack in position and prevent it from twisting.
The bench slab

The workbench surface, made of solid maple 1-1/2 in. thick, has a double row of 3/4-in.-dia. dog holes where an assortment of clamps, hold-downs, and benchdogs can be inserted. Holes bored into the front edge of the slab accept guide-rail clamps and a modified pipe vise. Four lever-action slide bolts hold the slab securely in position. When you want to use the lathe, those bolts are released, and the bench slab is rotated 180° and cranked upward.

Just behind the bench slab there is a removable wooden grille that fits over the inlet for a pair of exhaust fans. The fans draw fine sawdust into HEPA charcoal air filters. There is an aluminum screen fastened to the underside of the inlet grille to catch larger particles. A removable panel on the back of the cabinet allows servicing or replacement of the fans. To the left of the inlet grille is a pair of 110v electrical outlets.
The desk, the lid, and the fall front

To use the desk for writing or drawing, I adjust it so its top surface is approximately 30 in. above the floor and then pull it forward on its heavy-duty mechanical slides. Its height can be locked to prevent flexing. Whenever the lathe or the workbench is in use, the desk is pushed back into the cabinet, where it can be utilized as a shelf.

The cabinet’s lid, a solid-oak panel with breadboard ends, is rather heavy, so I installed two cabinet stays on each side to help lift it and to secure it in its open position. The soft-close lifts are reverse-mounted to achieve additional clearance.

On the inside of the lid there is a folding shelf, and below that hangs the crank for the lifting mechanism. I sometimes mount a 12-in. by 16-in. magnetic whiteboard inside the lid as well, and an LED light bar can be added under the lid’s front lip to illuminate the work area.

The frame-and-panel fall front, also made with solid quartersawn white oak, hinges forward and slides into the body of the cabinet for storage. I built a barrister equalizer to prevent the panel from racking as it slides in, and I installed jatoba wear strips inside the cabinet to prevent scratching on the panel face.

Greg Baker works wood in a basement shop in Whitby, Ont., Canada. Trained as an engineer in the early 1960s, he may be one of the last to have worked with technical drawing pens and india ink on drafting linen. To build this cabinet, he produced 25 pages of intricate drawings, which can be found here.
taunton_article_tile id=”443889″]

A Workbench That Works

New-Fangled Workbench, Revisited
Sign up for eletters today and get the latest techniques and how-to from Fine Woodworking, plus special offers.
Download FREE PDF
when you enter your email address below.
View PDF


