
Using Lines of Force (Regulating Lines) to Structure Your Landscape
 to Structure Your Landscape")
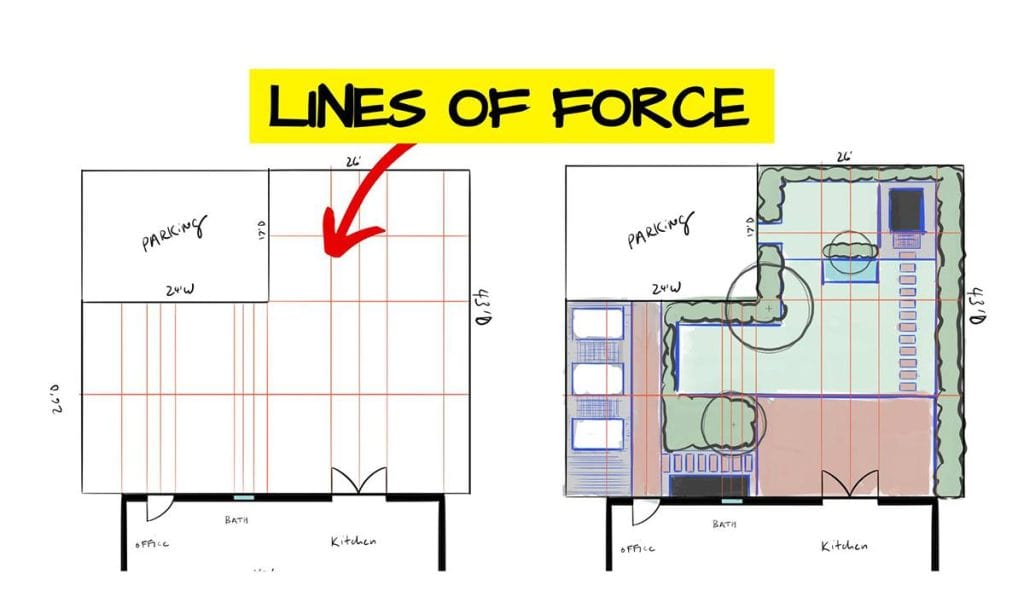
Designing a landscape can feel overwhelming. How do you decide where to place patios, lawns, or garden beds so everything feels connected? One of the simplest (yet most powerful) techniques in landscape design is using lines of force—also called regulating lines.
These lines of force can help us go from a simple bubble drawing to an actual landscape design plan that creates a strong connection of from the home to the landscape.
Using lines of force isn’t the only way to create a landscape plan, but it’s one of my favorite tools for making a yard feel cohesive and connected to your home.
Where to Start: Bubble Diagrams
Before I draw lines of force, I always start with a bubble diagram. A bubble diagram, or a bubble drawing, is a quick sketch of the different areas you want in your yard—patio, lawn, play area, garden beds, etc.
Once you’ve mapped out those big-picture zones from your wishlist, lines of force help refine and structure them so they connect beautifully with your home.
👉 Read the article: Bubble Drawings for Landscape Design: From Ideas to Layout
What Are Lines of Force?
Lines of force are imaginary lines that extend outward from your home or property structures—doors, windows, corners, sheds, even driveways. By laying out these lines, you create a flexible grid that ties your landscape back to your house and makes your design feel intentional.


Why Lines of Force Matter
- Creates harmony: Links your outdoor spaces directly to your home’s architecture.
- Simplifies design decisions: Provides a “guide” for aligning patios, lawns, walkways, and planting areas.
- Improves flow: Ensures that circulation paths and focal points make sense when moving through the space.
How to Draw Lines of Force
- Start with your house and property map (printout or tracing paper works great).
- Draw straight lines extending from:
- The edges of windows and doors
- Corners of the house
- Edges of patios, sheds, or driveways
- Experiment with different angles:
- 90° lines for a straightforward grid
- 45° angles (or even 30°/60°) for more dynamic layouts
- Add sight lines—draw from the center of doors and windows to place landscape focal points where you’ll see them from inside.
Applying Lines of Force in Your Design
Once your grid is drawn:
- Overlay your functional areas (patio, lawn, vegetable beds, play zones, etc.).
- Align elements with the regulating lines whenever possible.
- Share edges to keep the design clean (e.g., a patio edge lining up with a walkway or bed).
- Use converging lines to place focal points like trees, sculptures, or seating.
Below is a full walkthrough video of the entire process of creating lines of force.
Subscribe to my YouTube channel for more gardening videos!
Lines of Force Examples
Straight (90°) grid: Great for rectangular or square yards.

45° grid: Adds energy and visual interest; often useful for oddly shaped lots.

Mixed grids: Sometimes combining angles creates unique, tailored layouts.

Common Questions
Can I use lines of force with curvy designs?
Yes! Start with squares and rectangles first. Once you’re happy with the layout, you can “soften” edges and add curves.

Do I need to be exact?
Not at all, but it definitely helps to use rulers and have a to-scale design plan. Lines of force are guides, not rigid rules. They help you see possibilities and simplify decisions.
Wrapping Up
Lines of force aren’t a be-all-end-all solution, and they won’t design your yard for you. Think of them as a tool in your designer’s toolbox—a way to bring structure and clarity to your ideas. Once the lines are in place, that’s when the creative design work begins. Whether you use 90° grids, diagonals, or sight lines, this technique can transform a scattered yard into a cohesive design.
If you’d like a step-by-step way to apply this to your own yard, check out my Plant Perfect Activity Book—it guides you through diagrams, grids, and layout ideas in a fun, visual way.


